Simulation with OMNeT++
This chapter steps aside from the theory of distributed systems to ask a practical question: how do we study a distributed system before, or instead of, building it? The tool of choice for the course is OMNeT++, a discrete-event simulator written in C++. The material is presented in the same order as the lectures: first the general idea of studying a system through a model, then the specific machinery of discrete-event simulation, and finally OMNeT++ itself, developed through the standard TicToc tutorial and a fully worked token-ring exercise.
This lesson is not part of the written exam. It is included because it is genuinely useful and because one of the options for the optional course project is to implement a distributed protocol inside a simulator rather than as a real system. Read it for the project and for insight, not for the exam. Section 11 makes this explicit.
1. Ways to Study a System#
Engineers routinely study a system before committing the resources to build it. There are two broad ways to do so, and the second one branches further.
- Experiment with the actual system. You build the system and then test it. A bridge is loaded and observed; a piece of software is exercised by a test suite. This is what testing means: the artefact under study is the final artefact.
- Experiment with a model of the system. You build a model first and study that, under the hypothesis that the model faithfully captures the eventual system. A model can be:
- physical: a scale replica of the bridge that is loaded on a test bench;
- mathematical: a set of equations describing the system’s behaviour. A mathematical model is in turn studied either by an analytical solution (solve the equations: “this bridge sustains 1000 tons”), or by simulation (run the model operationally and observe what happens).
The same taxonomy applies to software. The theoretical complexity of a sorting algorithm (“linear”, “logarithmic”) is an analytical result on a mathematical model of the code. What this chapter is about is the other branch: building an operational model and running it.
2. Network Emulation#
Between “experiment with the actual system” and “use a model” sits a technique that is especially relevant for distributed systems: emulation. It arises from two practical obstacles to testing a distributed system on its real deployment.
- Not enough hardware. A system meant for hundreds of clients spread across a network cannot be tested on the few machines a developer has at hand.
- No control over the network. Even with the hardware, deploying on a real network means giving up control over exactly the aspects that most affect a distributed system: packet delay, packet loss, bandwidth, jitter. As the whole course has argued, the behaviour of the network has a decisive impact on the behaviour of the system on top of it.
The answer is to run the actual code of the system but over a controlled, emulated network. The key distinction:
A simulator models the system: it runs a program that imitates the system’s behaviour, and no real code of the system is executed. An emulator presents itself to the operating system exactly as the emulated component would. A network emulator appears to the OS as a real network interface card, but instead of driving a physical cable or Wi-Fi radio it applies configurable delays, drops, and rate limits to the packet flow.
Because the OS cannot tell the difference, the unmodified system code runs on top of an emulated network. Combined with virtual machines or containers (a VM is itself an emulation of a physical computer inside a physical computer), this gives a fully controlled test environment: tune the VMs to control processing power, tune the emulated network to control latency, bandwidth, and loss. Typical tools that intercept and reshape the packet flow are dummynet, netem (Linux traffic control), and Mininet. If you implement the project as a real system (in Java or another language), these tools let you answer questions like “how does my system behave when the network loses many packets, or has limited bandwidth, or long latency?” without needing a real wide-area network. The alternative, testing on two directly connected machines over a stable LAN, exercises none of the variability a real distributed platform exhibits.
With that parenthesis closed, we return to pure simulation.
3. Analyzing Before Building: Classes of Models#
Analysis requires a model of the system, and models come in several orthogonal flavours:
- Analytical vs. operational. An analytical model is a set of equations to be solved; an operational model is a procedure that is executed to reproduce the system’s behaviour.
- Discrete vs. continuous. Whether the model’s time (and quantities) advance in discrete steps or vary continuously.
- Deterministic vs. stochastic. In a deterministic model each state variable holds a single value at each instant; in a stochastic model a variable is associated not with one value but with a distribution of values (for example, “the server is in state A with probability 80% and in state B with probability 20%”).
These three axes are independent, so all combinations exist. Simulation is a special form of analysis in which we take an operational model, run it, and thereby obtain a history of the system’s execution, which we then study.
The specific kind of model this course uses is the discrete-event model: operational, discrete in time, and deterministic (the state variables are ordinary program variables, not distributions). We do not treat stochastic models.
4. Discrete-Event Simulation#
A discrete-event simulation is an operational, discrete-time, deterministic model of a system, built from four ingredients: a set of state variables, an event-processing (transition) function, a queue of events ordered by timestamp, and a simulation clock. The simulator repeatedly takes the earliest event, advances the clock to its timestamp, and runs the transition function, until no events remain.
4.1 The Ingredients#
- State variables describe the state of the system at each instant. Because the model is deterministic, these are plain variables in a programming language, not distributions.
- The transition function is the heart of the model. It takes the current state variables and one event, and it may (i) update the state variables and (ii) create new events. It is exactly the state-transition function of a state machine: the variables are the state, the function encodes the transitions, and the events are the triggers.
- The event queue holds events. Every event carries a content (whatever is being simulated) and a timestamp (always present). The queue is kept ordered by timestamp.
- The simulation clock models time, but it does not tick like a wall clock.
4.2 The Simulation Loop#
The engine of a discrete-event simulator is a strikingly simple loop:
forever:
    take the first (earliest-timestamp) event and remove it from the queue
    advance the clock to that event's timestamp
    pass the event to the transition function
        -> the function may update state variables
        -> the function may create new events (with timestamp >= current clock)
Two consequences of this loop are worth dwelling on, because they justify each word in the name “discrete-event”:
- The model is operational because it describes execution as a running state machine.
- Time is discrete because the clock does not advance smoothly: it jumps from one event to the next. If nothing happens between “now” and three hours later, the clock leaps three hours forward as soon as the next event is picked. This mirrors the space-time diagrams used throughout the course, where the exact wall-clock spacing between two events (one millisecond or one second) is usually irrelevant to correctness. A newly created event can never be given a timestamp earlier than the event being processed; unless a special mechanism schedules it into the future, it is created at the current clock value.
- The model is deterministic because the state variables are ordinary program variables. Re-running the same simulation reproduces the same history exactly.
The simulation ends when the queue is empty. Note the bootstrapping requirement: at least one event must be created at the start, otherwise the loop halts immediately.
4.3 Performance Indicators and the Log#
The transition function does more than update state and spawn events: it also updates special variables that log the execution. In the slides these are called performance indicators. What matters at the end is not the run itself but this log, which is analysed afterwards. Typical logged quantities are the average response time or the maximum length of a node’s input queue. By studying how these evolve, one draws conclusions about the system’s behaviour under the simulated conditions.
4.4 Pseudo-Random Inputs and Seeds#
If the transition function and the initial state are fixed, every run produces the same log. So how does one simulate the parts of the world that are not under the application’s control (users, the network, packet loss)? The transition function models your application; the uncontrolled parts are injected as random inputs. A user’s keystrokes or a request’s content are drawn from a random distribution, so that different runs exercise different scenarios.
Crucially, these are pseudo-random numbers produced by a generator with a seed. Fix the seed and the run is perfectly reproducible; change the seed and you obtain a different execution simulating different conditions. This is exactly what makes simulation both varied (across seeds) and debuggable (a suspicious run can be replayed bit-for-bit).
5. Discrete-Event Simulators and OMNeT++#
A discrete-event simulator is a piece of software that implements the loop of Section 4.2 so you do not have to. Its engine is trivial; its value lies in the libraries shipped alongside it:
- a library of general-purpose building blocks (random-number generators, containers, …);
- a library of ready-made models (hosts, routers, switches, …),
so that the programmer can write the transition function, which potentially describes the entire system, with far less effort. Many such simulators exist for networks and distributed systems: OpNet, QualNet, JiST/SWANS, Parsec/GloMoSim, J-Sim, Ns2, and OMNeT++.
We focus on OMNeT++ because it is open source, has a commercially supported variant widely used in practice, is well documented, and is easy to use. It is built in C++ and provides:
- a component model for splitting the big transition function into modules;
- a C++ class library (the simulation kernel plus many utility classes);
- the NED language for describing how components are wired together;
- a runtime GUI for watching a simulation unfold, and an Eclipse-based IDE for designing, running, and analysing simulations.
The C++ used is modest: for anyone who knows Java, the subset in play is close to familiar territory.
6. The OMNeT++ Component Model#
The first hurdle any simulator user faces is writing that one large transition function describing the system’s behaviour. OMNeT++ lets you avoid a single monolith by decomposing it into modules.
A simple module is a module whose behaviour is written directly in C++; its NED definition declares only its interface. A compound module contains other modules (simple or compound) and wires them together; it has no behaviour of its own beyond that wiring, and is written entirely in NED. The entire simulation is just an instance of the top-level module, which for historical reasons is called a network rather than a module.
A gate is a named port on a module through which messages are sent to or received from other modules. Gates are either input or output. Modules are connected gate-to-gate to build a hierarchy of modules.
A note on the word message: it is generic. A message may model a real network packet, but it may equally model a plain function invocation between two modules inside one process. A message that flows in zero time simulates an in-process call; a message that takes time to traverse its link simulates an actual packet on a network. We will see both.
6.1 Simple Modules: the NED Interface#
The NED definition of a simple module introduces only its interface: a name, optional parameters (tunable aspects of the module), and its gates. The behaviour lives in C++. The example below models the MAC (Medium Access Control) sublayer of an Ethernet card, characterised by an address parameter and four gates, two facing the physical layer and two facing the LLC (Logical Link Control) layer above.
//
// Ethernet CSMA/CD MAC
//
simple EtherMAC {
  parameters:
    string address; // others omitted for brevity
  gates:
    input phyIn;    // to physical layer
    output phyOut;  // to physical layer
    input llcIn;    // to EtherLLC or higher layer
    output llcOut;  // to EtherLLC or higher layer
}
6.2 Compound Modules#
A compound module lists submodules (each with a name and a type) and the connections between their gates. The EtherStation below composes an application traffic generator, an LLC module, and the MAC above, and exposes two external gates so that stations can in turn be plugged into a switch or hub. Its behaviour is nothing but the behaviour of its submodules plus this wiring.
//
// Host with an Ethernet interface
//
module EtherStation {
  parameters: ...
  gates: ...
    input in;     // for connecting to switch/hub, etc
    output out;
  submodules:
    app: EtherTrafficGen;
    llc: EtherLLC;
    mac: EtherMAC;
  connections:
    app.out --> llc.hlIn;
    app.in <-- llc.hlOut;
    llc.macIn <-- mac.llcOut;
    llc.macOout --> mac.llcIn;
    mac.phyIn <-- in;
    mac.phyOut --> out;
}
Because a compound module can itself be instantiated as a submodule, whole topologies are built by nesting. One could place two EtherStation instances (say a client and a server) inside a further compound module, wire their external gates through a link, and declare that outer module the network. When the app of one station generates a message, it flows through that station’s LLC and MAC, across the link, into the other station’s MAC, and up its stack. That single top-level instance is the entire simulation.
6.3 Implementing a Simple Module in C++#
For each simple module you write a C++ class with the same name as the module, extending the library class cSimpleModule. From it you inherit many methods and typically redefine three:
initialize()is called on every simple-module instance when the simulation starts;finish()is called on every instance when there are no more events to process;handleMessage(cMessage *msg)is called on an instance each time a message enters it, receiving that message as its argument.
Three further mechanics matter:
- The class must be registered with the
Define_Module(ModuleName)macro, which is the glue between the NED-level module and its C++ implementation. - A NED parameter is read from C++ with
par("paramName"). - A message is sent out through a gate with
send(cMessage *msg, const char *outGateName).
Unlike Java, C++ dispatches method calls statically by default, on the static type. To get Java-style dynamic dispatch (so that the kernel calls your initialize and handleMessage, not the empty ones in cSimpleModule), you must declare the overrides virtual. Forgetting virtual silently runs the base-class no-ops.
Also unlike Java, a C++ class separates declaration from implementation: the method signatures appear inside the class, but the bodies are written separately as ClassName::method.
6.4 From Modules and Messages Back to Events#
The module-and-message picture of Section 6 and the single-function-and-event-list picture of Section 4 are the same thing seen from two angles. The objects (module instances) collectively play the role of the one big transition function; the events are hidden inside the messages. Each time a module sends a message, an event is created carrying the timestamp of the current clock, and it is placed in the engine’s event queue. If several messages are produced, their timestamps decide the processing order.
Where do delays come from? A connection may introduce a delay. If a module emits a message at time over a link with delay , the corresponding “message arrives” event is enqueued at time , and picking it up later advances the global clock. In-process calls use zero-delay links, so they do not move the clock.
A discrete-event simulator has a single global clock and, for once, the god’s-eye view of the whole distributed system that the theory insists no participant can ever have. It is tempting, but wrong, to use this global clock inside the simulated logic: your simulated processes must behave as if each had only its own local clock, exactly as they would in reality. The global clock belongs to the engine, not to the model.
In the C++ API, modules and messages are handled through pointers. new cMessage(...) returns a pointer; send takes a pointer; handleMessage receives a pointer. Sending a message hands the same object to the receiver rather than a copy, which becomes a real pitfall once a module needs to keep or resend a message (see Section 8.3).
6.5 Message Classes#
Messages are subclasses of the library class cMessage. An empty cMessage merely signals a flow of control; to carry data (to model a real packet) you define your own message class in a small dedicated language, using the message keyword. Each such definition is translated automatically into a C++ class whose instances flow between modules.
message NetworkPacket {
  fields:
    int srcAddr;
    int destAddr;
}
6.6 Collecting Results: Scalars and Vectors#
Each module instance is a C++ object and so may carry its own attributes, which serve as the model’s state variables. Beyond those, OMNeT++ offers two kinds of logged output, corresponding to the performance log of Section 4.3:
- Scalar variables are written to disk (a
.scafile) once, at the end: only the final value matters. Example: the total number of packets received by a server, or an average computed atfinish(). - Vector variables (a
cOutVector, written to a.vecfile) let yourecorda value during the run; each recorded value is automatically timestamped with the current simulation time. The result is a named series of(timestamp, value)pairs. Example: recording the content of every packet a MAC handles, so that afterwards one can plot how many packets arrive per second.
Recording of individual vectors can be enabled, disabled, or restricted to a time interval from omnetpp.ini. The library also includes helper classes such as cLongHistogram to accumulate statistics. The Eclipse IDE then loads these files and offers graphical tools to plot and analyse them (for example, counting the events per second in a vector file and drawing the resulting curve). This analysis, not the animated run, is the real product of a simulation.
6.7 Random Numbers#
Generating data randomly is a constant need (recall Section 4.4). OMNeT++ provides a configurable number of RNG (Random Number Generator) instances, or streams, which can be mapped freely to individual modules from omnetpp.ini (for example, all traffic generators draw from stream 0, all MAC backoffs from stream 1, and so on). Seeding is automatic or manual, with manual seeds also coming from the ini file. Many distributions are available from both NED and C++: uniform, exponential, normal, truncnormal, and others. A non-const module parameter can even be assigned a random variate such as exponential(0.2), so that the C++ code gets a fresh draw each time it reads the parameter (see the volatile parameters in the token-ring exercise).
7. The TicToc Example#
TicToc is the standard OMNeT++ tutorial. The scenario is minimal: two nodes in a network, tic and toc; one of them creates a packet and sends it to the other, and the two keep passing the same packet back and forth forever.
7.1 The Topology File#
tictoc1.ned declares one simple module Txc1 with an in and an out gate, and a network Tictoc1 holding two instances of it, wired both ways. The connection syntax --> can be annotated with channel properties; here each link is given a fixed delay = 100ms, modelling a perfectly reliable point-to-point link that delays every packet by 100 ms regardless of its size.
simple Txc1 {
  gates:
    input in;
    output out;
}

// Two instances (tic and toc) of Txc1 connected both ways.
network Tictoc1 {
  submodules:
    tic: Txc1;
    toc: Txc1;
  connections:
    tic.out --> { delay = 100ms; } --> toc.in;
    tic.in  <-- { delay = 100ms; } <-- toc.out;
}
7.2 The Simple Module#
txc1.cc gives the behaviour. After the mandatory #include <omnetpp.h> and using namespace omnetpp;, the class Txc1 extends cSimpleModule and is registered with Define_Module. In initialize(), the module checks its own name (inherited getName()): only the instance called tic creates the first message and sends it out, so that exactly one event bootstraps the simulation. In handleMessage(), either instance simply forwards the message it received back out through out.
#include <string.h>
#include <omnetpp.h>
using namespace omnetpp;

class Txc1 : public cSimpleModule {
  protected:
    virtual void initialize();
    virtual void handleMessage(cMessage *msg);
};

Define_Module(Txc1);

void Txc1::initialize() {
  if (strcmp("tic", getName()) == 0) {
    // create and send the first message; only "tic" does this
    cMessage *msg = new cMessage("tictocMsg");
    send(msg, "out");
  }
}

void Txc1::handleMessage(cMessage *msg) {
  // whoever receives it just forwards it
  send(msg, "out");
}
The message created in initialize() is the first event. Without it, the loop would have no event to process and would stop immediately.
7.3 The omnetpp.ini File#
A single ini file controls one or more configurations of the simulation. There is a [General] section and one [Config ...] section per configuration; each must at least name the network it runs. It is also where NED parameters are overridden per run: for example, Tictoc4.toc.limit = 5 sets the limit parameter of the toc submodule of the Tictoc4 network. The excerpt below shows the pattern.
[General]
# nothing here

[Config Tictoc1]
network = Tictoc1

[Config Tictoc4]
network = Tictoc4
Tictoc4.toc.limit = 5
As written, Tictoc1 never terminates: there is always a next ping-pong event. One typically adds a sim-time-limit (in the ini) or an in-code stopping condition to end the run.
7.4 Compiling and Running#
Outside the IDE the workflow is three commands: opp_makemake generates a makefile, make compiles, and ./tictoc runs. (Inside the IDE it is a single button, and the makefile is generated for you.) The runtime GUI then animates the network.
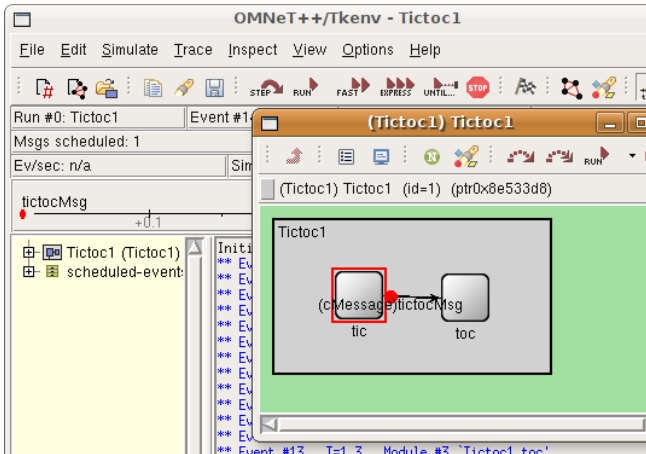
Stepping executes one handleMessage and stops; Fast drops the animation but keeps the textual log; Express runs with no interaction at all, which is what you use in production because the point is the data collected in the scalar and vector files, not the animation. Simulated time is not real time: a second of wall-clock work can simulate thousands of simulated seconds.
8. Enhancing the Simulation#
The tutorial grows TicToc in steps. Three of them introduce mechanisms that are essential for any realistic distributed-systems simulation.
8.1 Leveraging Inheritance#
Instead of testing getName() to decide who sends first, a parameter with a default can carry that decision, and NED modules can inherit from one another with simple X extends Y. Here a base Txc5 declares a boolean sendMsgOnInit and an integer limit, plus a display icon; Tic5 and Toc5 extend it, changing only the icon colour and the sendMsgOnInit value. Parameter values can still be overridden per instance in the ini file.
simple Txc5 {
  parameters:
    bool sendMsgOnInit = default(false);
    int limit = default(2);
    @display("i=block/routing");
  gates:
    input in;
    output out;
}
simple Tic5 extends Txc5 {
  parameters:
    @display("i=,cyan");
    sendMsgOnInit = true;
}
simple Toc5 extends Txc5 {
  parameters:
    @display("i=,gold");
    sendMsgOnInit = false;
}

network Tictoc5 {
  submodules:
    tic: Tic5;
    toc: Toc5;
  connections:
    tic.out --> {delay = 100ms;} --> toc.in;
    tic.in  <-- {delay = 100ms;} <-- toc.out;
}
On the C++ side, a private counter is initialised from par("limit") and exposed to the GUI with the WATCH(counter) macro, so its value is visible and updates live while clicking on the module. Each ping-pong decrements the counter; when it reaches zero the module deletes the message instead of resending it, and since there are then no more messages there are no more events and the simulation ends.
8.2 Modelling Delays and Timers with Self-Messages#
So far, time advanced only because the channel added delay: each node received and resent in zero time. To model processing delay or a timeout, a module sends a message to itself, scheduled into the future with scheduleAt(time, msg). Such a self-message is the general mechanism both for “do something later” and for “wake me up to check whether something failed to happen”.
The txc8 module keeps two attributes: a simtime_t timeout (the OMNeT++ time type, essentially a double in seconds) and a cMessage *timeoutEvent pointing at the self-message. simTime() returns the current clock, so scheduleAt(simTime()+timeout, timeoutEvent) arms the timer. In handleMessage, comparing the incoming pointer against timeoutEvent distinguishes “the timer fired” from “a real message arrived”; in the latter case cancelEvent(timeoutEvent) disarms the timer before rescheduling it.
Full listing: txc8.cc (delays and timers)
#include <stdio.h>
#include <string.h>
#include <omnetpp.h>
using namespace omnetpp;

class Tic8 : public cSimpleModule {
  private:
    simtime_t timeout;       // timeout
    cMessage *timeoutEvent;  // holds pointer to the timeout self-message
  public:
    Tic8();
    virtual ~Tic8();
  protected:
    virtual void initialize();
    virtual void handleMessage(cMessage *msg);
};

Define_Module(Tic8);

Tic8::Tic8()  { timeoutEvent = NULL; }
Tic8::~Tic8() { cancelAndDelete(timeoutEvent); }

void Tic8::initialize() {
  timeout = 1.0;   timeoutEvent = new cMessage("timeoutEvent");
  EV << "Sending initial message\n";
  cMessage *msg = new cMessage("tictocMsg");   send(msg, "out");
  scheduleAt(simTime()+timeout, timeoutEvent);
}

void Tic8::handleMessage(cMessage *msg) {
  if (msg == timeoutEvent) {              // the timer fired
    EV << "Timeout expired, resending message and restarting timer\n";
    cMessage *msg = new cMessage("tictocMsg");   send(msg, "out");
    scheduleAt(simTime()+timeout, timeoutEvent);
  } else {                               // a real message came back
    EV << "Timer cancelled.\n";
    cancelEvent(timeoutEvent);
    cMessage *msg = new cMessage("tictocMsg");   send(msg, "out");
    scheduleAt(simTime()+timeout, timeoutEvent);
  }
}
EV << writes to the runtime log area, and bubble("...") (used elsewhere) pops a speech bubble over the module during animation. cancelAndDelete in the destructor cleans up a possibly still-scheduled self-message.
8.3 Using Copies of Messages#
Because messages travel by pointer, a module that wants to keep a message and also send it must send a copy, or it will lose ownership of the object it is holding. The txc9 variant demonstrates the idiom: generateNewMessage() builds a fresh message with a unique name each time (tic-1, tic-2, …), while sendCopyOf(msg) duplicates the message with msg->dup() and sends the copy, so the original stays under the sender’s control for possible retransmission.
Full listing: txc9.cc (copies of messages)
void Tic9::initialize() {
  seq = 0;
  timeout = 1.0;   timeoutEvent = new cMessage("timeoutEvent");
  EV << "Sending initial message\n";
  message = generateNewMessage();   sendCopyOf(message);
  scheduleAt(simTime()+timeout, timeoutEvent);
}

void Tic9::handleMessage(cMessage *msg) {
  if (msg == timeoutEvent) {
    EV << "Timeout expired, resending message and restarting timer\n";
    sendCopyOf(message);                 // resend the kept original, by copy
    scheduleAt(simTime()+timeout, timeoutEvent);
  } else {
    EV << "Received: " << msg->getName() << "\n";
    delete msg;                          // consume the incoming acknowledgement
    EV << "Timer cancelled.\n";
    cancelEvent(timeoutEvent);
    delete message;
    message = generateNewMessage();   sendCopyOf(message);
    scheduleAt(simTime()+timeout, timeoutEvent);
  }
}

cMessage *Tic9::generateNewMessage() {
  // Generate a message with a different name every time.
  char msgname[20];
  sprintf(msgname, "tic-%d", ++seq);
  cMessage *msg = new cMessage(msgname);
  return msg;
}

void Tic9::sendCopyOf(cMessage *msg) {
  // Duplicate message and send the copy.
  cMessage *copy = (cMessage *) msg->dup();
  send(copy, "out");
}
To run a different scenario, change the RNG seed in the ini file (the default seed is 0 for everyone, so re-running reproduces the identical run). Several ini stanzas, one per seed, give several independent executions of the same model.
9. Worked Exercise: Simulating a Token Ring#
The tutorial closes with an exercise substantial enough to be worth simulating, and directly relevant to the course: use OMNeT++ to simulate a token-ring protocol controlling access to a shared resource (the printer example from the synchronization lectures). The nodes are arranged in a ring; a single token circulates, and a node may access the printer only while it holds the token. This lets us measure what the theory only describes: how long a node waits for the printer, and how that waiting time depends on ring size, channel speed, and how often nodes contend.
9.1 Design#
All nodes are identical, so a single simple module TierNode suffices, instantiated n times. The design uses:
- a boolean parameter
sendMsgOnInitso that exactly one node (the leader) creates the first token; - two
volatiletime parameters,requestPeriod(how long a node goes without needing the printer) andusePeriod(how long printing takes), each defaulting to a random distribution.volatilemeans the distribution is re-sampled on every access, so each read yields a fresh draw; - two self-messages:
needResource(scheduledrequestPeriodinto the future, “it is time for me to print”) andfinishedUsingResource(scheduledusePeriodinto the future, “I am done printing”); - a scalar
numSent(tokens forwarded) and acOutVectorwaitingTime(one waiting-time sample each time the node finally gets the token); - the ring wiring, built with a
forloop and the trick of connectingnodes[i].outtonodes[(i+1)%n].in(the modulo closes the ring).
The waiting time is the star measurement: when a node decides it needs the printer it records startWaitingTime; when the token finally arrives it records simTime() - startWaitingTime into the vector. This captures the defining cost of a token ring: even a node that wants the printer while no one else does must wait for the token to come round.
9.2 The NED File#
The channel MyChannel extends ned.DatarateChannel and gives every link a random latency (a uniform distribution around 100 ms) and a random bandwidth (a normal distribution centred at 1 Mbps), so no two links are identical (until you fix the seed).
Full listing: the token-ring NED (reconstructed from the lecture)
simple TierNode {
  parameters:
    bool sendMsgOnInit = default(false);
    volatile double requestPeriod @unit(s) = default(uniform(300s, 500s));
    volatile double usePeriod     @unit(s) = default(uniform(1s, 2s));
    @display("i=block/routing");
  gates:
    input in;
    output out;
}

channel MyChannel extends ned.DatarateChannel {
  delay    = uniform(90ms, 110ms);   // per-link latency, drawn once per link
  datarate = normal(1Mbps, 1kbps);   // per-link bandwidth, drawn once per link
}

network TokenRing {
  parameters:
    int n = default(5);
  submodules:
    nodes[n]: TierNode;
  connections:
    for i = 0..n-1 {
      nodes[i].out --> MyChannel --> nodes[(i+1)%n].in;
    }
}
9.3 The C++ Behaviour#
handleMessage branches on which of the three message kinds arrived, identified by comparing the incoming pointer against the stored self-message pointers (an alternative is to compare msg->getName(); keeping a pointer avoids recreating the object on every reschedule). When the token arrives and the node needs it, the node records its waiting time, keeps the token, and schedules finishedUsingResource to model the printing time; when printing finishes it forwards the token and re-arms needResource. A node that receives the token without needing it forwards it immediately.
Full listing: the token-ring C++ (reconstructed from the lecture)
#include <omnetpp.h>
using namespace omnetpp;

class TierNode : public cSimpleModule {
  private:
    cMessage *needResourceEvent;          // self-message: "time to print"
    cMessage *finishedUsingResourceEvent; // self-message: "done printing"
    cMessage *token;                       // the token, while this node holds it
    long numSent;                          // scalar: tokens forwarded
    bool needResource;                     // do I currently need the printer?
    simtime_t startWaitingTime;            // when I began waiting for the token
    cOutVector waitingTimeVector;          // vector: recorded waiting times
  public:
    virtual ~TierNode();
  protected:
    virtual void initialize();
    virtual void handleMessage(cMessage *msg);
    virtual void finish();
};

Define_Module(TierNode);

TierNode::~TierNode() {
  cancelAndDelete(needResourceEvent);
  cancelAndDelete(finishedUsingResourceEvent);
}

void TierNode::initialize() {
  WATCH(numSent);   WATCH(needResource);
  numSent = 0;
  needResource = false;
  token = nullptr;
  waitingTimeVector.setName("waitingTime");

  needResourceEvent          = new cMessage("needResource");
  finishedUsingResourceEvent = new cMessage("finishedUsingResource");

  // schedule my first "I need the printer" event
  scheduleAt(simTime() + par("requestPeriod").doubleValue(), needResourceEvent);

  if (par("sendMsgOnInit").boolValue()) {   // the leader creates the token
    EV << getName() << " creating the token\n";
    cMessage *t = new cMessage("token");
    send(t, "out");
    numSent++;
  }
}

void TierNode::handleMessage(cMessage *msg) {
  if (msg == needResourceEvent) {
    // it is time to print, but I do not have the token yet
    needResource = true;
    startWaitingTime = simTime();
    EV << getName() << " needs to access the resource\n";
    bubble("need");
  }
  else if (msg == finishedUsingResourceEvent) {
    // finished printing: release the token, plan my next need
    needResource = false;
    EV << getName() << " done, forwarding the token\n";
    bubble("done");
    send(token, "out");   token = nullptr;   numSent++;
    scheduleAt(simTime() + par("requestPeriod").doubleValue(), needResourceEvent);
  }
  else {
    // the message is the token
    if (needResource) {
      // I was waiting for it: record how long, then start printing
      waitingTimeVector.record(simTime() - startWaitingTime);
      EV << getName() << " got the token, accessing the resource\n";
      bubble("printing");
      token = msg;   // keep it while printing
      scheduleAt(simTime() + par("usePeriod").doubleValue(),
                 finishedUsingResourceEvent);
    } else {
      // I do not need it: forward immediately
      send(msg, "out");   numSent++;
    }
  }
}

void TierNode::finish() {
  recordScalar("sent", numSent);   // written to the .sca file
}The professor showed the token-ring code live in the editor and promised to post it; it is not in the slide deck. The NED and C++ above are a faithful reconstruction from the lecture’s description, consistent with it but not guaranteed identical to the posted solution. The numeric periods are illustrative “fake numbers” (the professor’s phrase); their absolute values do not matter, only their ratios.
9.4 What the Simulation Reveals#
An omnetpp.ini sets a sim-time-limit (say one simulated hour) and picks the leader and the ring size, and defines experiments that vary a single factor:
[General]
sim-time-limit = 3600s

[Config TokenRingSmall]
network = TokenRing
TokenRing.n = 10
TokenRing.nodes[0].sendMsgOnInit = true

[Config TokenRingBusy]
network = TokenRing
TokenRing.n = 10
TokenRing.nodes[0].sendMsgOnInit = true
**.requestPeriod = uniform(60s, 120s)   # nodes contend for the printer more often
Loading the resulting .vec file in the IDE, the waiting-time series shows the expected structure. With a fast channel (roughly 100 ms per link), a node that wants the printer while no one else does waits only for the token to reach it: about half a ring traversal on average, so around half a second for a ten-node ring. Larger waiting times mean other nodes printed first: a value near 97 s, for instance, is a node that had to wait behind two other print jobs. Making the nodes contend more often (the TokenRingBusy experiment) lengthens the average waiting time markedly. The general conclusions the simulation confirms quantitatively: waiting time grows with ring size, shrinks with channel speed, and grows as nodes request the resource more frequently. Changing only the ini file (even the random draws) needs no recompilation, since parameters are loaded dynamically.
9.5 Further Enhancement: Lossy Channels#
The exercise then asks to make the ring realistic by allowing the token to be lost. A channel can inject errors through its ber (bit-error rate) or per (packet-error rate) attributes, and the receiver checks the packet’s bit-error flag (hasBitError() on cPacket). To recover from a lost token, add a mechanism to rebuild it: designate a single leader node that runs a sufficiently long timeout, and when that timeout expires (implying the token has vanished) the leader creates a fresh token. This is exactly the self-message-as-timer pattern of Section 8.2, now used for token regeneration.
10. Recap: the OMNeT++ Toolbox#
| Concept | NED / C++ mechanism | Purpose |
|---|---|---|
| Simple module | simple M { ... } + C++ class M : public cSimpleModule |
leaf component; behaviour in C++ |
| Compound module | module M { submodules: ...; connections: ... } |
wires submodules; no own behaviour |
| Network | network N { ... } |
top-level module; the whole simulation is one instance |
| Gate | input g; output g; |
named port for sending/receiving messages |
| Connection / channel | a.out --> {delay=...;} --> b.in |
link between gates; may add delay, datarate, loss |
| Lifecycle hooks | initialize(), handleMessage(cMessage*), finish() |
start-up, per-message behaviour, wrap-up (declare virtual) |
| Registration | Define_Module(M); |
binds the C++ class to the NED module |
| Send a message | send(msg, "out") |
emit through an output gate (creates an event) |
| Self-message / timer | scheduleAt(simTime()+d, ev), cancelEvent(ev) |
model delays, timeouts, periodic actions |
| Copy a message | msg->dup() |
send while keeping ownership (pointers!) |
| Read a parameter | par("p"), volatile in NED |
tunable input, re-sampled per access if volatile |
| Randomness | uniform, exponential, normal, … + RNG seed |
model uncontrolled inputs reproducibly |
| Results | scalar .sca (final values), cOutVector .vec (timestamped series) |
the analysable output of a run |
| Configuration | omnetpp.ini: [Config ...], network=, sim-time-limit, parameter overrides |
drive one or many runs without recompiling |
11. Relation to the Exam and the Project#
No past written-exam question concerns simulation or OMNeT++, and by the professor’s own statement this lesson is not part of the written test. It earns its place for two reasons. First, it turns the discrete-event model into a concrete, checkable object: for once the whole distributed system, with its single global clock, is laid out in front of you (which is precisely why you must not let the simulated logic exploit that global clock). Second, it underpins one option for the optional project: rather than implementing a distributed protocol as a real system, you may simulate it in OMNeT++, and the token-ring exercise of Section 9 is a complete, working template for doing exactly that. If instead you build a real system, the network-emulation tools of Section 2 let you subject it to the adverse network conditions a simulator would otherwise impose.